
In the digital age, visual content has become a vital component of online communication. Whether you’re a blogger, a student, or a professional, the ability to capture and share screenshots efficiently can greatly enhance your work. One tool that excels in this regard is the Snipping Tool, a built-in utility in Windows operating systems. In this article, we’ll explore how to harness the power of Snipping Tool for various purposes, from creating informative blog posts to sharing visual instructions.
What is Snipping Tool?
Snipping Tool is a simple yet powerful screenshot utility that comes pre-installed with Windows operating systems (Windows 7, 8, and 10). It allows users to capture screenshots of any part of their screen, whether it’s a full window, a specific area, or a custom shape. With its intuitive interface and basic editing features, Snipping Tool is an indispensable tool for anyone who needs to capture, annotate, and share screenshots quickly and easily.
Getting Started with Snipping Tool
Using Snipping Tool is incredibly straightforward. Here’s a step-by-step guide to help you get started:
- Accessing Snipping Tool: To launch Snipping Tool, simply type “Snipping Tool” in the Windows search bar and press Enter. Alternatively, you can find it under “Accessories” in the Start menu.
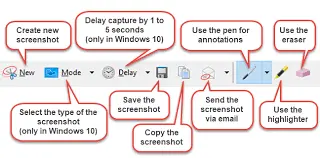
- Choosing a Snip Type: Once Snipping Tool is open, click on the “New” button to initiate a new snip. You’ll then have the option to select the type of snip you want: Free-form Snip, Rectangular Snip, Window Snip, or Full-screen Snip.
- Capturing the Screenshot: After selecting the desired snip type, use your mouse to capture the portion of the screen you want to include in the screenshot. For example, if you choose the Rectangular Snip, click and drag to select the area you wish to capture.
- Annotating (Optional): Snipping Tool offers basic annotation tools that allow you to highlight or draw on the captured screenshot. Click on the “Pen” or “Highlighter” tool to annotate as needed.
- Saving and Sharing: Once you’re satisfied with the screenshot, click on the “File” menu and select “Save As” to save the screenshot to your desired location. You can also copy the screenshot to the clipboard or share it directly via email or other applications.
Advanced Tips and Tricks
While Snipping Tool is a user-friendly tool for basic screenshot needs, it also offers some advanced features that can enhance your productivity:
- Keyboard Shortcuts: To expedite the screenshot process, you can use keyboard shortcuts such as Windows Key + Shift + S to open the Snipping Tool in a snipping mode directly.
- Delay Feature: Snipping Tool allows you to set a delay before capturing a screenshot, which can be useful when capturing pop-up menus or tooltips. Simply click on “Delay” and choose the desired delay time.
- Customizing Settings: You can customize various settings in Snipping Tool, such as choosing the default file format (JPEG, PNG, GIF, or HTML), enabling or disabling the ink color and thickness, and more.
Practical Applications for Bloggers
As a blogger, Snipping Tool can be a valuable asset in creating visually engaging content. Here are a few ways you can leverage Snipping Tool for your blog:
- Illustrating Tutorials: Use Snipping Tool to capture step-by-step screenshots for tutorials or instructional guides.
- Highlighting Quotes or Data: Capture snippets of text or data from articles or research papers to include in your blog posts.
- Creating Visual Examples: Capture screenshots of software interfaces, websites, or digital artwork to provide visual examples in your blog content.
Conclusion
In conclusion, Snipping Tool is a versatile and user-friendly tool for capturing and sharing screenshots on Windows operating systems. Whether you’re a blogger, educator, or business professional, mastering Snipping Tool can significantly enhance your ability to create informative and visually compelling content. With its intuitive interface and advanced features, Snipping Tool remains a go-to tool for all your screenshot needs. So next time you need to capture and share a screenshot, remember to turn to Snipping Tool for a seamless experience.


